I had an odd failure on the 14th of Feb when I tried to start my new favourite plane (the Great Planes Skybolt) ready for its fourth flight of the day. As usual, I wound the prop backwards until it was against compression before applying my starter. However, I was surprised to find that there was now no compression at all from this nearly new OS 91.

After doing basic checks on the glow plug and valve rockers (by removing the rocker cover) and finding nothing apparently wrong, I decided to give up and took her home.
When I got the plane apart at home, I discovered that the intake valve was not operating correctly. It wasn’t springing back up, at least not fully. The engine head was removed and the spring extracted. It was in two pieces.
This was not a failure mode I’ve come across during my short time in the modelling world. I was very surprised, especially as this engine is nearly new.
I expect that most are familiar with the process of removing valves but if like me you’ve never done it before, then what you have to do is support the valve from underneath (I just used a finger but wood is a good alternative), then compress the valve spring by pressing down on the retainer cap.

This will allow the two tapered collet halves to drop out. However, because the collet halves have a fairly gentle taper, they grip the retainer cap and I was unable to push hard enough with my remaining fingers to release it. I ended up using an M3 nut driver to push down on the retainer, which popped down with quite a snap as the taper released. Using the nut driver also had the advantage of catching the two collet halves before they flew off somewhere.
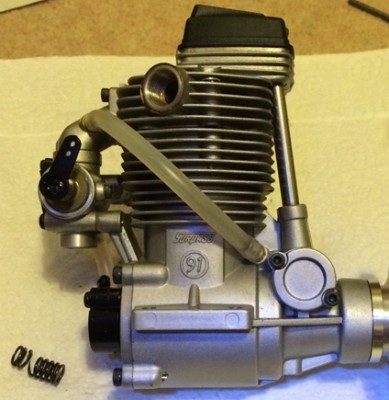
In the picture above you can see the now empty intake valve guide on the left and the assembled exhaust valve on the right.
A new spring was purchased from Just Engines and cost about £2.50 I think. Trouble is they had a minimum order price of about £6 so I bought some other little bits and got it all delivered within two days.
Reassembly was fun. I was able to hold the valve spring and its retainer cap down while holding the valve itself up using my fingers but this only left my face available to put the collet halves back in. If I took one hand away, I couldn’t hold the spring retainer down long enough or with enough stability to get the collets on.
I needed a spring compressor. After a couple of minutes thought I wondered if the threaded hole used to secure the rocker cover could help me out.

It was very close to the valves, so I thought that a screw with a washer could be used to press on the spring retainer.
In the picture you can see the arrangement that worked for me (taken after I got the valve assembled). As the screw was one of the actual rocker cover screws, it was a bit long for this job, hence the nut and other washers acting as spacers.
It’s not ideal of course because it’s only pressing on one side of the retainer. Initially, the retainer and spring tried to escape sideways from under the washer so I used my thumb on the other side to stabilise it. Of course this method also compressed the exhaust valve spring too (forcing the valve down a bit) but that didn’t matter.
Once the spring is compressed far enough, the valve guide tube prevents the arrangement moving sideways. This was all done with the valve in its guide but just resting on the work surface. Frankly, it could have been left out altogether. Once the spring was compressed far enough, the valve was pushed up and the tiny, tiny little collet halves were placed and held (by finger and thumb) in the groove. The screw was then wound out, which allowed the retainer to ride up and encapsulate the collet halves.
All that remained was to reassemble the top end of the engine. During this process, I was slightly bemused by the gasket on the intake tube. It doesn’t matter which of the four possible orientations you use, it just doesn’t match the shape of the port and the location of the mounting screws. Who designed that?

The reassembly went smoothly and compression has now returned.